
When it comes to going on a camp, having an ideal tent is very critical to the success or failure of the camping trip. The Coleman Dark Room Sundome 6-Person Tent has been gaining juggernauts thanks to its unique features, among which is the dark room technology made to trap the sunlight and maintain the temperature cooler within.
Should you, therefore, place your money on this tent and hope to gain something in return? This exploration of the tent masterly covers such topics as design, features, functionality, and feedback from actual users to enable you to decide whether it is the one for your next outdoor activity. Whether you are an experienced camper or you are new at it, your decision-making will, after our analysis, be fully backed by sufficient understanding.
Is the Coleman Dark Room Sundome 6-Person Tent Worth It? An In-Depth Review
Here’s an analysis of how much you’ll be prepared to spend to purchase and own this tent from Coleman.
Unboxing and First Impressions
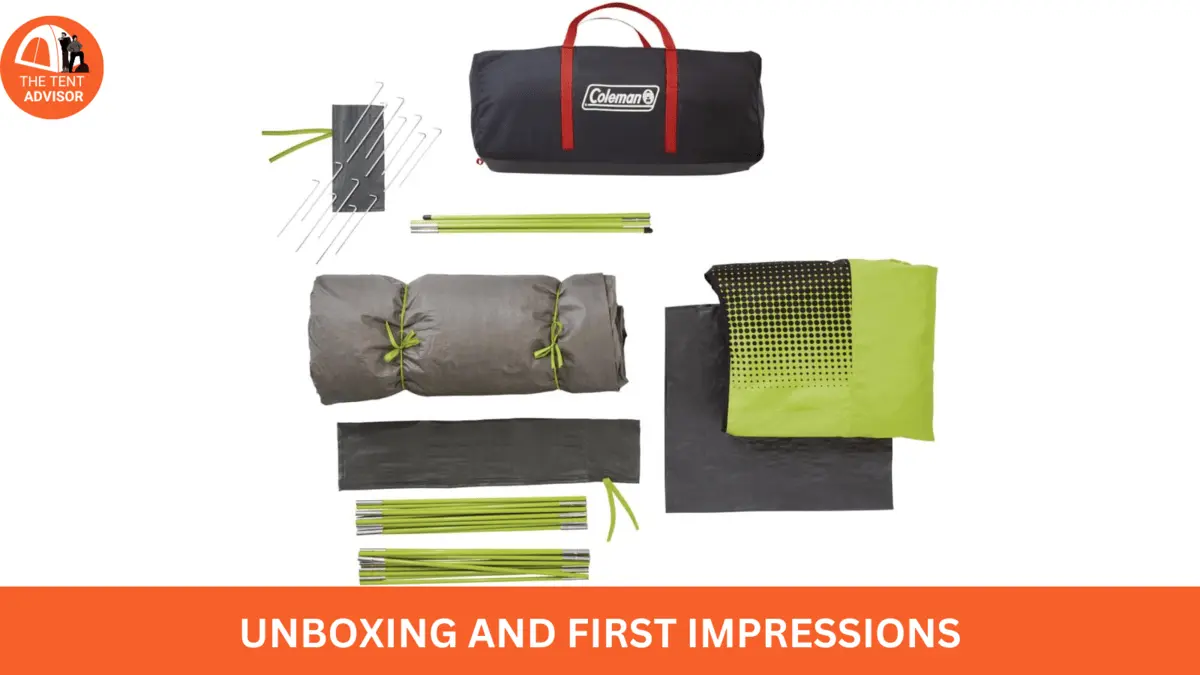
When I first received the tent, the packaging was quite color coordinated and well organized, yet not bulky. The tent pack is not hefty, given that it comes in a portable, easy-to-manage carrying case that has a handle, so moving around with the tent is easy. Even the case was color coordinated, which made it easier to take from the camping load without searching.
The inside contents of the bag were packed up very securely. The tent fabric itself was very well rolled in, and all other required fittings were therein:
Description of the Packaging and Contents
Tent Body: Rolled up into a small cylinder-shaped jig, the dark room technology material was at the outermost end of the roll.
Rain Fly: This fly was stored separately in a separate bag designed for use in emergent circumstances only for rain coverage of the tent.
Poles: Long, short sections of light yet strong poles wrapped around each other in handy kits, and every length was clearly marked for convenience.
Stakes and Guy Lines: Packaged in a zip lock bag, all these were marked in a very conspicuous manner for easy retrieval.
Instructions: Easy to read in-depth instruction keeping in mind the tag-and-follow phases.
Every aspect of the work was completed professionally and practice-oriented so that there were no omissions and everything was intact.
Initial Thoughts on the Tent’s Design and Materials
The interior design of the tent caught my eye as soon as I laid eyes upon it. The dark room technology was precise on the cloud fabric, which was a primary color that is darker than ordinary tents. The overall design was impressively constructed, looking firm and not just good in beauty but in usefulness as well. The arrangement of the poles seemed to be purposeful for ease of up but focused on the stability part as well.
The materials used felt premium and would withstand high physical stress. The material used in the making of the tent was of a rather suitable thickness and it seemed like it would do pretty well in blockading light and heat.
The rain fly looked strong enough to resist the rain and was of adequate size and coverage. The poles of the tent were made out of light aluminum, which is quite good regarding portability. Still, I thought they were a little more pliable than I expected. The zippers worked adequately, but I had a feeling they were the lightweight ones, though they were friendly and seemed to work without snagging.
First Impressions: Before I even set foot inside the tent, my initial inclinations were quite favorable. The configuration looked quite appealing and solid, with the necessary attention given to providing a dark and comfortable internal environment.
The speedy setup promise was encouraging, and the materials used made me feel that there would be a good performance of the tent with different elements. However, It was the darkroom feature that l was super pumped about, and which is also the main reason I bought it.
Generally, the moment I opened the tent, I had very high expectations about how it would perform and I just couldn’t wait to erect it and try the tent while camping.
Key Features:
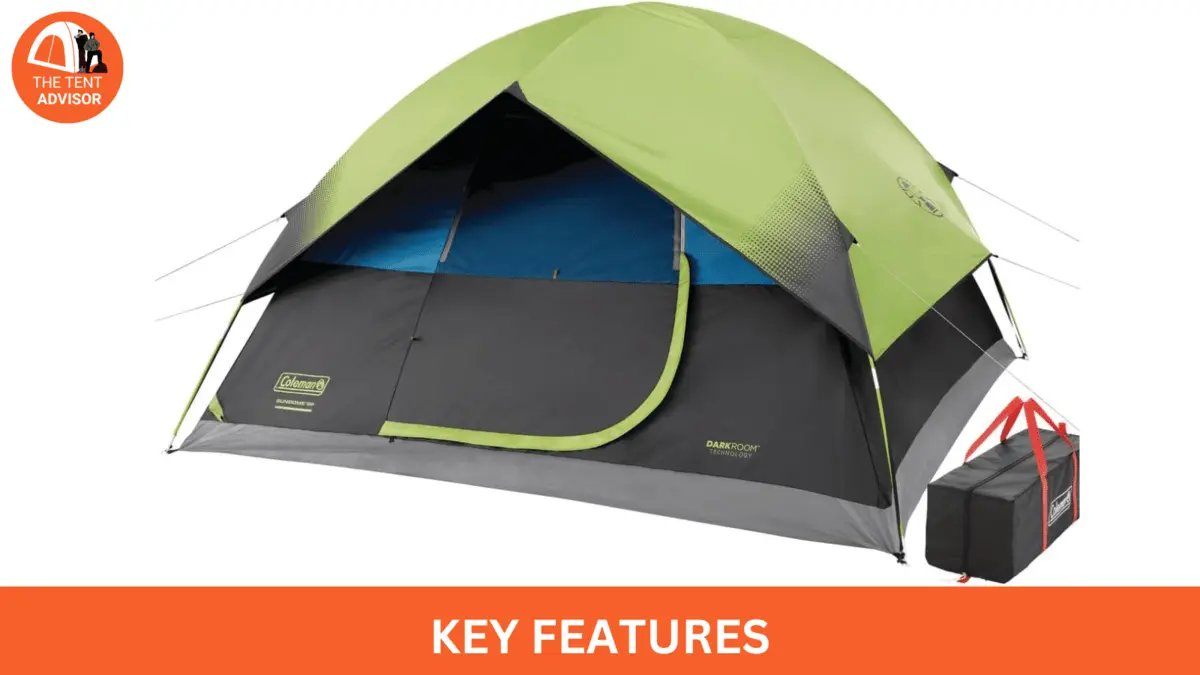
Dark Room Technology: This is one of the features that stand out in performance, the Dark Room technology, as it includes lowering the illuminance level inside the tent by a lot. This is quite useful for people, exceptionally light sleepers during the day or even at night when they prefer sleeping in a dark tent.
Want to know more about What is dark room tent technology is? Read this article
Ease of Setup: The tent remains uncomplicated in terms of setting up and taking down for usage, which makes it ideal for all camping levels. With step-by-step directions that are clear and a system that is well thought out, it takes approximately eleven and a half minutes for it to be put.
For more advice read on How to pitch a tent?
Spaciousness: The tent has a peak height of seventy-three (73) inches, which many users report is adequate sitting height for most people. It takes six sleeping pads or four people on two queen beds comfortably. This makes it well-suited for family holidays or group outings.
Ventilation and Weather Resistance: The tent held up well in light rain and experienced no leakage. However, in the event of a heavy downpour, a small amount of leaking was witnessed, mainly from the seams. It has two vents and two windows that enhance the airflow to fair margins.
Affordability: With a little over 100 dollars, the Coleman Dark Room Sundome is quite simple when it comes to pricing, relatively lower when looking at most tents with the same characteristics.
Pros:
- Utility: Dark Room function – Makes a significant improvement in sleep quality as the tent is kept much more relaxed and darker.
- Cheap: Well within the budget, subjects make it relatively easy to purchase.
- Enough of Height and Space: Headroom and other space is more than enough for six persons up and above.
- Simple Setup and take down: Simple to work with even for a person camping alone.
Cons:
- Seams: The seams, especially the inverted ones, could be a weakness in case it rains heavily; however, this concern can be dealt with with sealant.
- Pockets: It does not include other most conventional-looking pockets or compartments. There are only two stretchable pockets and a lantern loop providing limited possibilities for storing items.
Setting Up and Soaking in The Folds
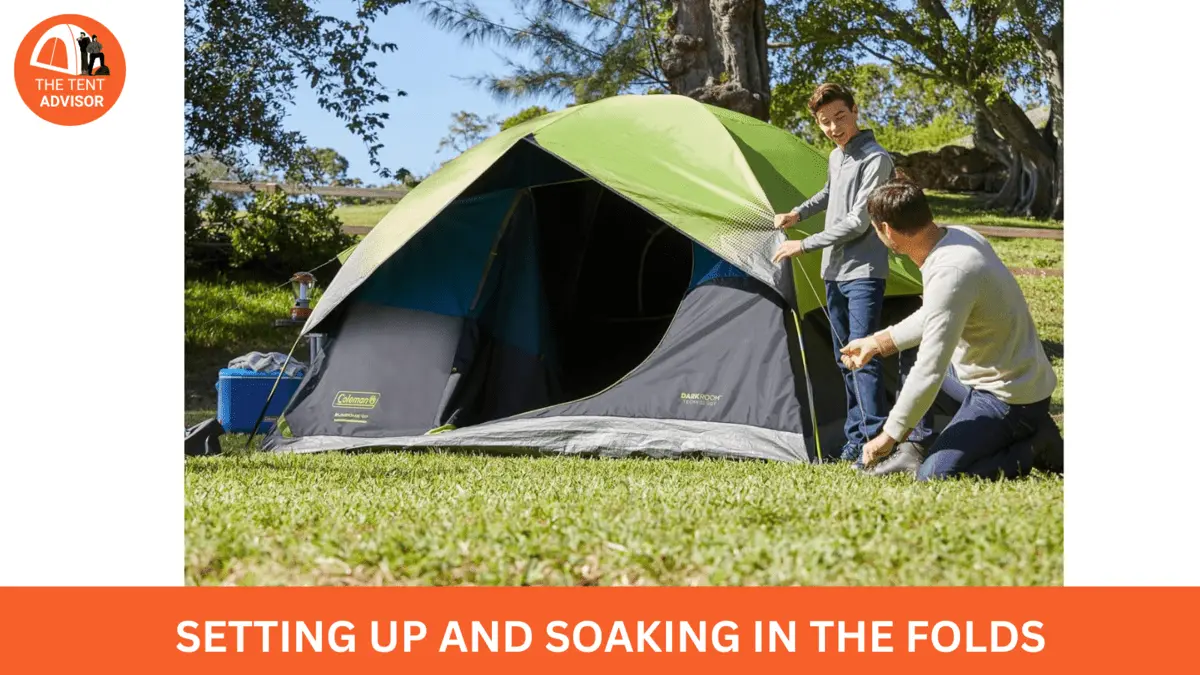
Step 1: Lay out the site
Pick up appropriate ground: Avoid holding areas with vast outcrops of wooden, stone, or pointed objects like twigs. Make sure that the ground is even in order to avoid suffering discomfort or damaging the tent.
For more advice visit our guide
Unpack the Tent: Unzip and remove the tent body from its carrying bag and then place it flat onto the ground. Spread it out level, paying attention to the corners, with the top of the tent directed to where you wish.
Identify Components: Confirm that you have all the necessary components (tent body, rain fly, poles, stakes, guy lines) and that they are in the right state.
2-Inserting and Securing the Fiberglass Poles
Assemble the Poles: Unpack the fiberglass poles and attach the relevant parameters as indicated. It is expected to find an elastic cord in most poles which makes joining them easy.
Insert the Poles: Locate the pole sleeves or clips, if any, on the tent body. Each pole must go into the sleeve or clip marked for it. Most tents consist of the lot’s main body poles to erect and then support poles for additional support.
Raise the Tent: After inserting the poles, the tent body can be lifted by pulling the poles up and placing them in pole pockets or grommets designated for that purpose. Check that the foot of each pole is positioned and fully inserted in the clips.
3-Fixing the Rainfly to the Tent
Position the Rainfly: Spread the Rain Fly over the top of the tent. Ensure it is in the correct position so that it wraps a tent body entirely and the seams of the rainfly are correctly aligned with those of the tent.
Secure the Rainfly: Using the hooks, Velcro strips, or clips provided, attach the Rainfly to the tent body. Place the cover around the upper part of the tent, making sure that it does not leave any Zippers exposed.
Make Any Accurate Changes if Required: Using the elastic loops provided on the inner walls of the flye, any fitting adjustments to hide those parts should be made. Most dust or rain collected on the inner skirt surface touches the water. As buoyancy persists, the water almost creeps in through the sides.
4-Staking Down and Guying Out the Tent
Stake Down the Corners: Use the provided stakes in order to secure all four corners of the tent. Hammer the stakes into the ground at an angle of about 45 degrees from the tent in order to provide excellent holding.
Attach Guy Lines: The lady shall then get to the tent in one momentum and stabilize the guy line points fixed to her with the tent and the rainfly. Locate the guys. It’s the point in the tent, and the fly attaches, says, bushes to these points and fixes them out to adjust their tension and keep the tent tight.
Adjust Tension: After raising or pegging the walls, note the amount of tension needed within the standard frame of the tent. This helps in shaping and preventing the tent from drooping or flapping.
Time Taken for Setup and Take Down
Setup Time: Putting up the tent should take at most 10 to 20 minutes in a standard setting. This duration includes laying out the tent, assembling and inserting the poles, attaching the rainfly, and staking everything down.
Take Down Time: Efforts to take down the tent take about the same duration as setting it up. Take out all the stakes and guy lines as well as the poles and rainfly to then fold the tent body. Put all the items back in the carrying bag.
Tips for Efficient Setup and Take Down
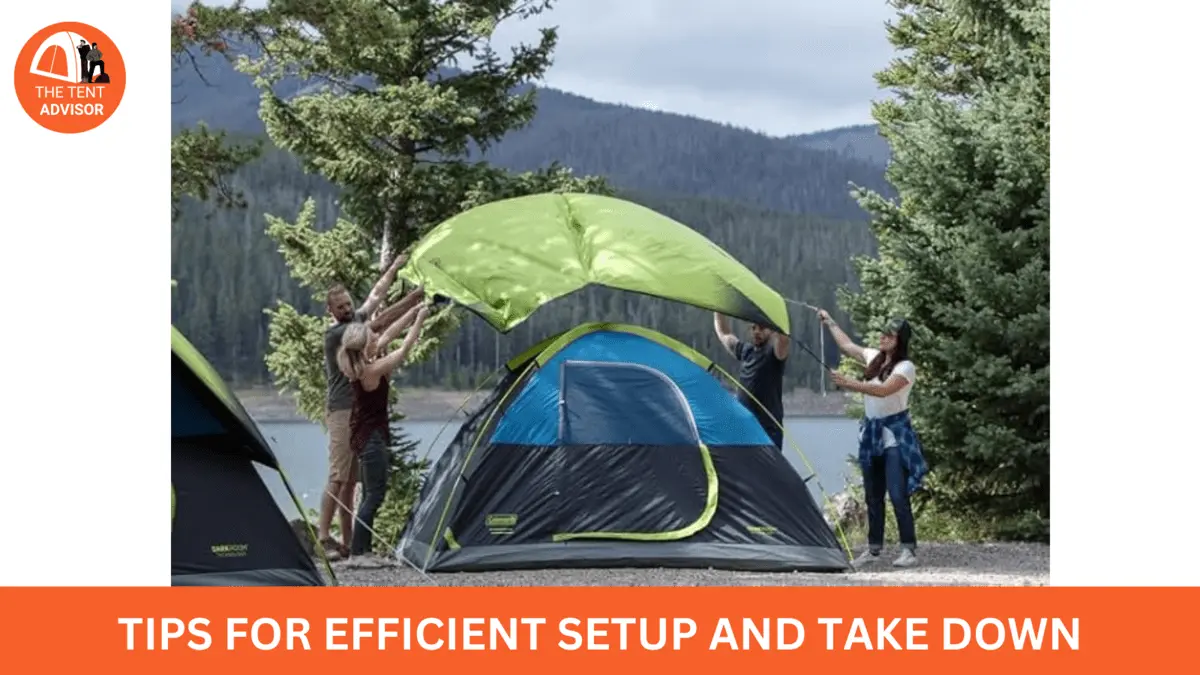
Read Instructions First: Get to understand the setup instructions before you start. Understanding the procedure will ease the Setup, and there shall be no applications unless necessary.
Practice at Home: Prepare to put up and take down the tent beforehand, even from your living room or backyard. This will enable you to know how the process goes and what challenges may be faced.
Use a Ground Cloth: Put a ground cloth or tarp underneath the tent in order to preserve the bottom from wear and tear and dirt.
Get With a Partner: When it comes to doing it all by yourself, it is going to take up a lot more of your time and meaningful efforts, especially with the larger tents and the more awkward conditions.
Keep Components Organized: Poles should be stored in their bags or tents, and stakes and guy lines should be placed in oaths in one place to avoid losing any components and to make the setup process less odious.
Personal Experience with This Tent

I am now an expat tent user, and as a result, I have had the opportunity to use this tent quite a lot and, therefore, be able to present a clear situation for its usage.
Dark Room Technology – Dark Room Technology is one feature of particular appeal for the maker of this tent. I found that it was particularly good at stopping light from entering and, hence, significantly improving sleep quality. In our case, it has reduced the chances of waking up with the bright sunshine hitting the tents from early bright, bright mornings. It is beneficial for my partner, who sleeps lightly and requires wearing a sleep mask or resting in dark conditions.
The space inside is ample: Yes, there is plenty of space inside the tent. We quickly placed a queen-sized air mattress in, and there was still enough space for our baggage. There was a high ceiling, so we could easily stand and change clothes in the tent. One time, we even turned the tent inside out and used it to glow in glow-in-the-dark. It did well for that, too.
Setup and Takedown: Putting up the tent was straightforward and didn’t take too long. I was able to cope with it alone without problems, although the presence of an extra pair of hands is always welcome. It is likewise easy to stow away; it goes back into the bag with little effort, which is suitable for space saving in the car.
Weather Performance: All the tent design features worked properly during moderate rain and light storms. The occupants remained dry inside while the rainfly performed its purpose of keeping water out. However, while exposed to high wind conditions, there were some aspects of the tent that the poles were weak. Let’s say that on one such trip, the tent was somewhat bending and shifting due to strong winds and that caused a little bit of concern. Fortunately, there were no severe damages, but it also stressed the fact that the tent, in particular, was probably not designed for very windy places.
Durability: In the course of several years, there have been a few problems that I have already had to deal with. The poles, I must say, especially such that the level of performance was not as was identified, which compelled me to change out a few of the sections within the first several years and so. Furthermore, the zippers should have been more solid. They tended to get stuck out or were not as reliable as I would like them to be.
To sum up my experience with this tent, it has been quite pleasant. It performs very well concerning dark room capabilities, provides good space and comfort, and is quite simple to operate. Just be careful when it comes to using the tent in very windy situations, test the artificial poles and zippers regularly, and they will last you for a very long time.
Want to look for more tents similar to coleman ? Chech this one
Is the Coleman Dark Room Sundome 6-Person Tent Worth It? Yes Definitely worth it
The Coleman Dark Room Sundome 6-Person Tent is a tent worth buying for summer camping if you are looking for a low-cost and multifunctional tent. Dark room technology is especially beneficial to people who want a cool and dark space. There are some disadvantages which include seam durability and insufficient storage space. Still, in general, the pros are more than the cons. All in all, it is very satisfying price-wise. It works pretty well in all weather, so it is an excellent purchase for occasional campers and families.
FAQs : Is the Coleman Dark Room Sundome 6-Person Tent Worth It?
Is the Coleman Skydome waterproof?
The Coleman Skydome has been made to be water resistant and not completely waterproof. The purpose of the tent utilizes Coleman’s WeatherTec features like tub floor, corner welds, and inverted seams to offer a cozy shelter in low to medium rainfall. It is effective for most campers in ways of protecting their gear from the elements; probably the only time they would not get this is if they were going in for some heavy rain or prolonged wet environments.
Is Coleman suitable for camping?
Coleman has always been one of the leading brands in outdoor searching equipment, which has been in existence for so long. As with camping gear, Coleman tents are known for their probang for the buck, durable hard sides, and functional ease. They enjoy high turnover on the market, particularly from camping enthusiasts who do not want to spend through their nose for sound equipment.
Are Coleman tents good in the rain?
Most Coleman tents, though, are mostly water resistant but not waterproof. Coleman offers what it calls the WeatherTec system, which employs tub floors, corner welds, and inverted seams to guard its occupants against severe, moderate rains. For continued heavy rain, more measures or a tarp should be applied in order to keep everything dry.
What is the difference between the Sundome and the Skydome?
The Coleman Sundome and Skydome differ in most aspects, such as measurements and specific design features. For example, a Coleman 4-Person Sundome is nine by 7 feet in dimensions, while a Coleman 4-Person Skydome is eight by 7 feet. The other general feature is that the Skydome tends to be around the same height as the Sundome. However, the interior layout tends to be quite different due to a sleek and quick setup that is more commonly seen with these domes.
Will the tent by Coleman get wet, and can they be washed?
Of course, Coleman tents may be washed, but in the correct way. For example, to clean a tent, it is adequate to make use of a sponge with some mild detergent in order to wipe off the dirt. Do not put it in a washing machine. The machine will harm the fabric and the seams of the tent. After washing, it is recommended to leave the tent to dry completely in the open air before putting it away.
For more knowledge on camping tent brands visit our guide